본 포스팅은 (주)부릉의 MSA 스택에 대한 내용으로, 모든 MSA가 아래와 같은 내용으로 구성되는 것이 아닙니다. (주)부릉의 온보딩 내용을 정리한 포스팅입니다.
1. 요구사항
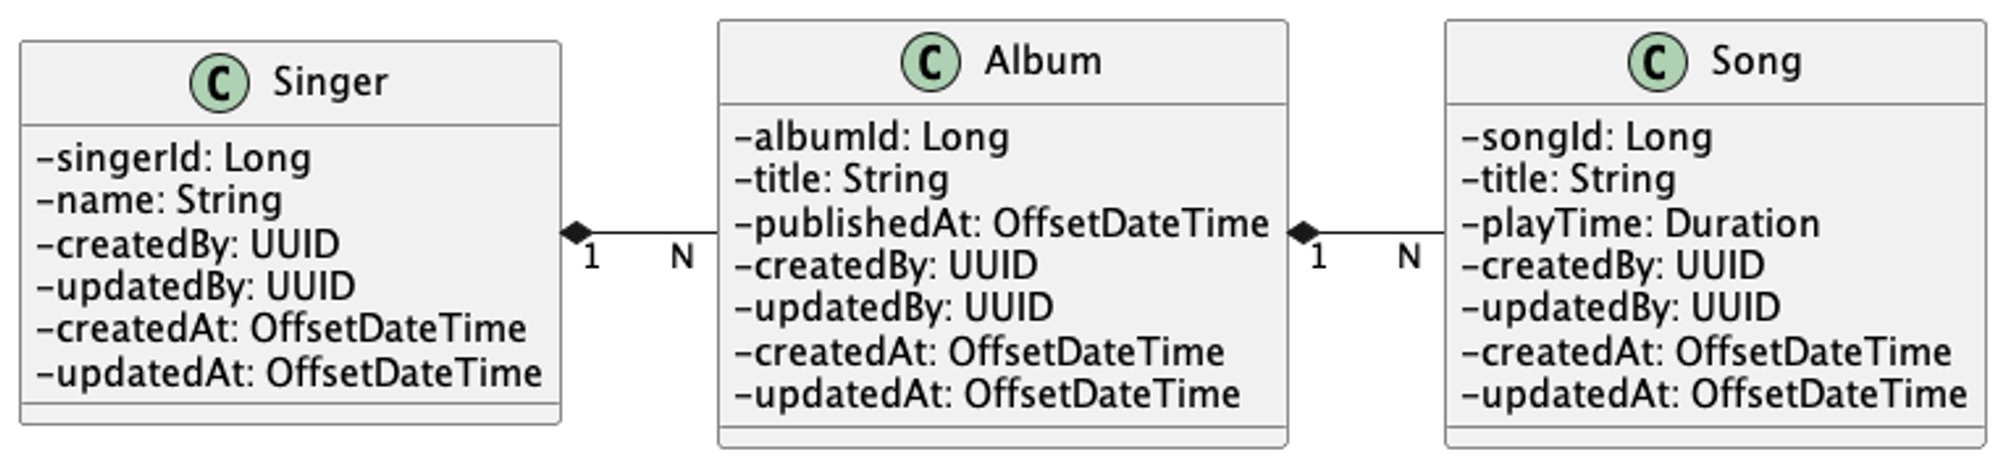
- 아주 간단한 웹 기반 ITunes
- 주요 데이터는 다음과 같다.
- 가수 (Singer)
- 이름 정보를 가진다.
- 앨범 (Album)
- 발매 날짜, 앨범 제목 정보를 가진다.
- 노래 (Song)
- 노래 제목과 재생 시간 정보를 가진다.
- 공통 데이터
- 생성 시간
- 업데이트 시간
- 생성한 사람
- 업데이트한 사람
- 가수 (Singer)
- 주요 기능
- 가수를 등록할 수 있다.
- 앨범을 등록할 수 있다.
- 노래를 등록할 수 있다.
- 노래 목록들을 조회할 수 있다.
- 노래를 조회할 수 있다.
- 노래를 업데이트 할 수 있다.
- 노래를 삭제할 수 있다.
엔티티 Class
2. 프로젝트 scaffolding
섀시 패턴
- 아래와 같은 프로젝트들의 공통 관심사를 편리하게 설정할 수 있다.
- health check 패턴: actuator
- 개발 생산성 확보: spring-configuration-processor, lombok, mapstruct:
- 로깅 패턴: logback, request - response 로깅
- 추적 패턴: B3 Propagation(Sleuth), Sentry 적용
- 로컬 개발 환경: docker-compose를 이용한 local cluster 구성 (UAA + MySQL + Kafka + …)
- Persistence: QueryDSL, JPA Specification integration
- API-First: OpenApi Generator 및 Zalando problem details 연동
- Scheduler: ShedLock 연동
- Security: UAA 및 리소스 서버 통합
- CI / CD: 도커 이미지 빌드, 젠킨스 연동
msa-bootcamp 프로젝트 세팅 (Meshkorea)
git clone https://github.com/meshkorea/msa-starter.git- starter project를 clone한다.
cd msa-starter && ./gradlew generate- 위 명령어를 수행하면 아래와 같은 세팅 메세지가 나온다.
Starting a Gradle Daemon (subsequent builds will be faster)

> Task :getBuildInfo
> WebMVC/JPA 프로젝트인가요(m)? WebFlux/R2DBC 프로젝트인가요(f) (default: m)?
<====---------> 33% EXECUTING [17s]
> 부릉 프로젝트입니까(y/n, default: n)?:
<====---------> 33% EXECUTING [27s]
> 사용하려는 자바 버전은 무엇입니까(1.8/11, default: 11)?:
<====---------> 33% EXECUTING [31s]
11
> 프로젝트 이름은 무엇입니까(default: example)?
<====---------> 33% EXECUTING [35s]
> 그룹 이름은 무엇입니까(default: com.vroong)?
<====---------> 33% EXECUTING [38s]
> 웹 서버 포트는 무엇입니까(default: 8080)?
<====---------> 33% EXECUTING [42s]
> 웹 요청 및 응답에 사용할 미디어 타입은 무엇입니까(default: application/vnd.vroong.private.v1+json)?
<====---------> 33% EXECUTING [47s]
진행할까요('n' to quit)? [osArch:intel, projectType:v, projectName:example, groupName:com.vroong, packageName:com.vroong.example, portNumber:8080, mediaType:application/vnd.vroong.private.v1+json, javaVersion:11, dockerImage:amazoncorretto:11-alpine-jdk, skipTokens:[.DS_Store]]
<====---------> 33% EXECUTING [50s]

> Task :generate
cp -r build {path-to-your-project}cd {path-to-your-project} && ./gradlew clean buildgit init
로컬 개발 환경 구동 방법
- JDK 설치
- corretto11
- jhipster-uaa 세팅
- msa-starter 디렉토리의 jhipster-uaa.zip을 해제한다.
cd jhipster-uaa && ./gradlew jibDockerBuild -Djib.to.image=jhipster-uaa -Djib.to.tags=latest- 로컬에서는 jhipster-uaa를 사용하지만, EKS에 올렸을 때는 이미 구동중인 vroong-uaa를 사용한다.
- 도커 구동
./gradlew clusterUp- MySQL (3306)
- Kafka (9092)
- jhipster-uaa (9999)
- 애플리케이션 구동
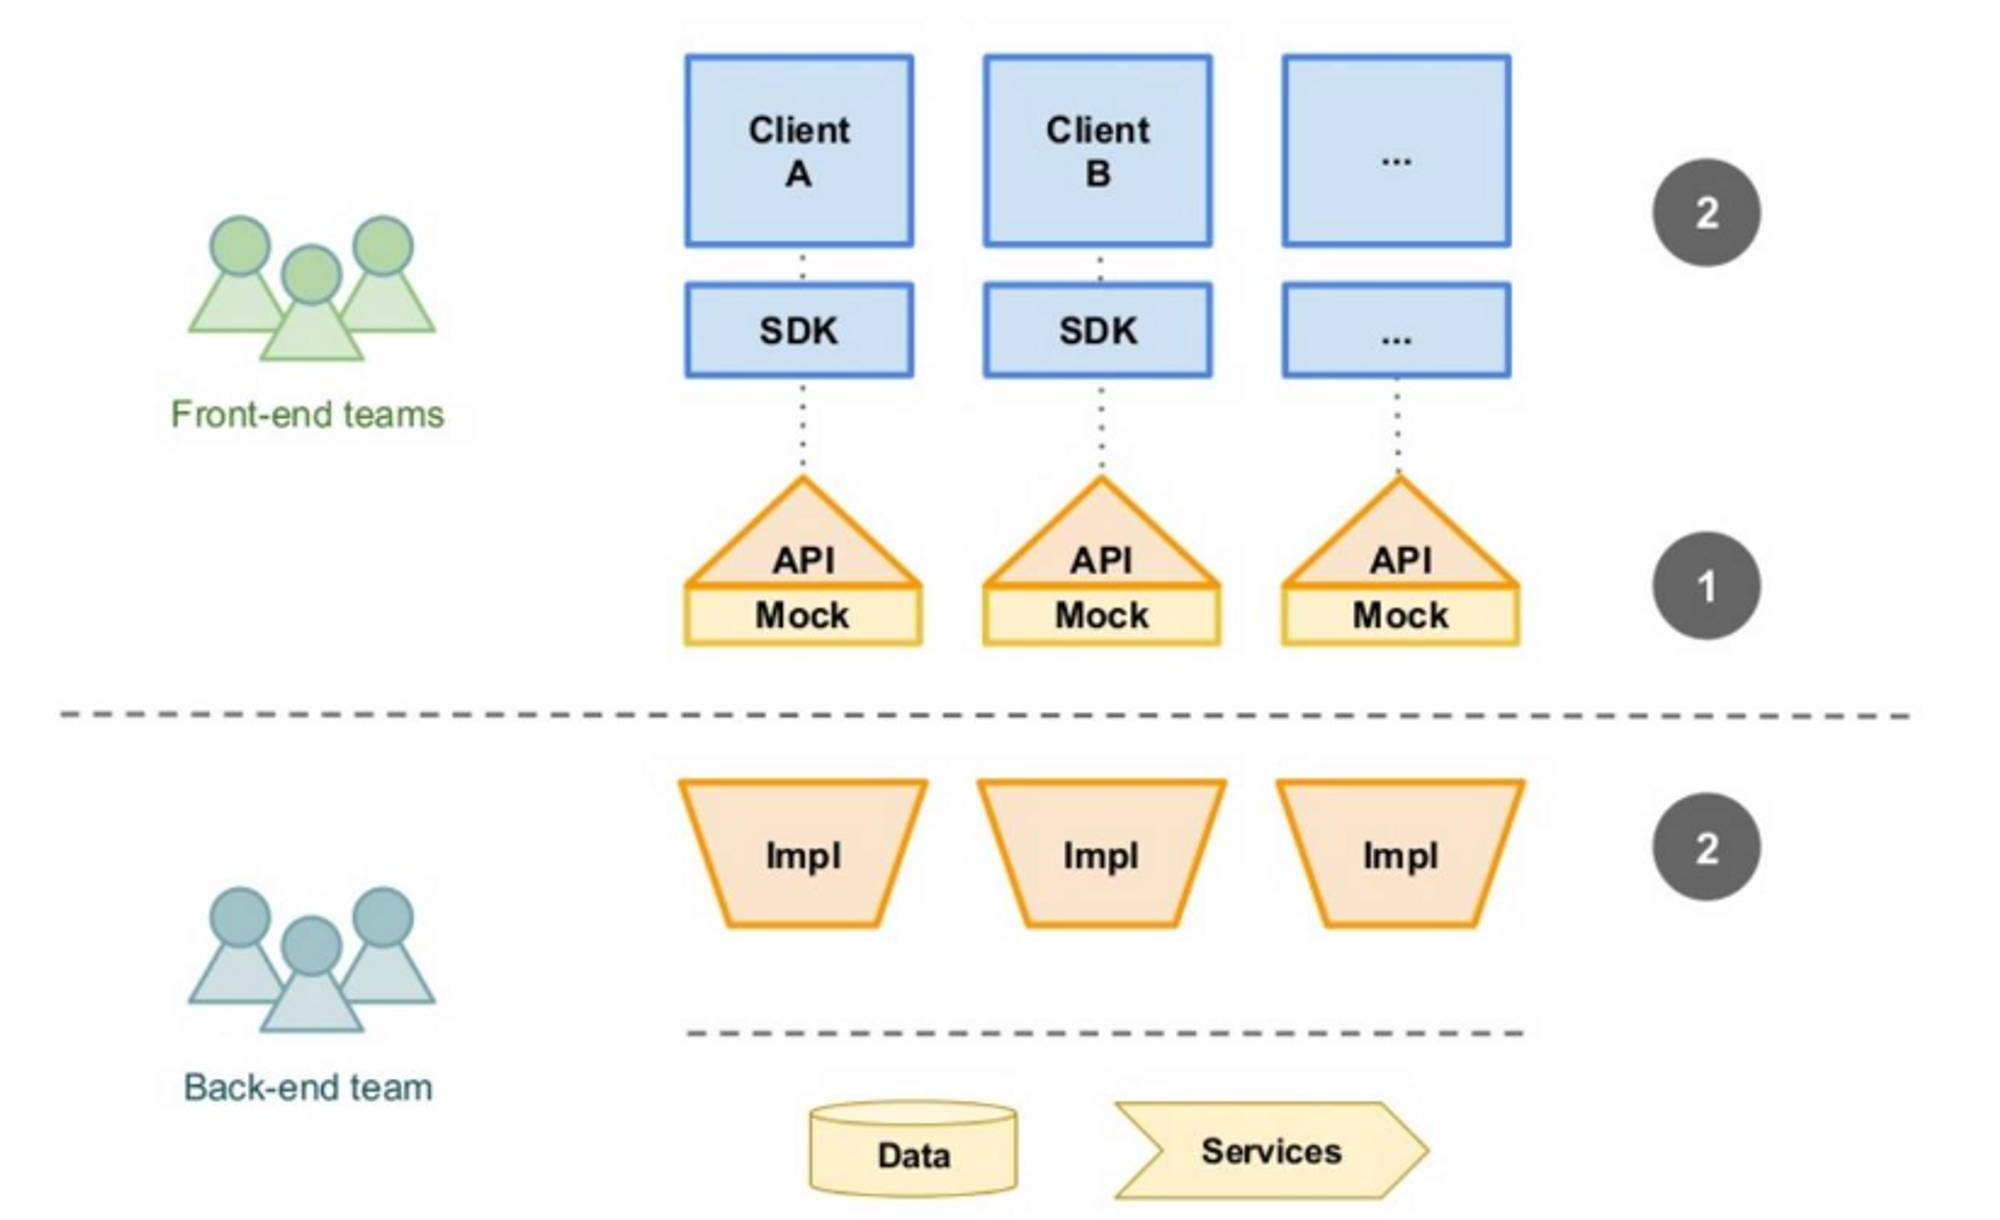
3. API-First 개발 방법론
API-First 개발 방법론
- API를 중심으로 제품을 설계하는 방법이다.
- API는 중요한 비즈니스 요소이며, 개발 조직에 API를 제공하는 것이 높은 우선순위를 가진다고 인식하는 것이다.
API-First 장점
- 일관성 제공
- API-First 도구를 사용하여 일관성 있는 설계 및 문서화를 통해 일관된 개발자 경험을 제공할 수 있도록 해준다.
- 병렬 개발 편의성
- API를 먼저 설계하고 결과물로 나온 API Spec을 이용해서 서버 스켈레톤과 클라이언트 SDK(API 문서 + 클라이언트 라이브러리 Stub)를 생성할 수 있고 클라이언트와 서버가 생성된 코드를 이용해서 빠르게 개발을 시작할 수 있다.
- 개발 속도 향상
- API-First 도구는 클라이언트 SDK를 생성해주고, 이를 사내 Repository에 공유할 수 있다.
- 개발자들은 Mock API를 사용함으로써, API가 완성되기 전에 클라이언트를 구축할 수 있다.
- 빠른 피드백 제공
- 클라이언트 개발자는 서버 개발자가 개발 완료 후 API를 제공할 때까지 기다리지 않고, API 문서와 Mock API를 이용하여 설계를 검토하고 검증해볼 수 있다.
API-First 도구 - OAS (OpenApi Specification)
- OAS는 REST API를 위한 IDL(Interface Defintion Language) 이다.
- API 스펙 및 기능, 설명을 기술한다.
- OAS 파일은 YAML 또는 JSON으로 작성할 수 있다.
- OAS 파일은 아래 내용을 포함한 내용을 기술할 수 있다.
- API endpoint와 HTTP method (GET /users, POST /users 등)
- 각 API의 요청과 응답의 파라미터
- 인증 method
- 이용 방법, 라이센스, 연락처 등과 기타 정보
- Swagger Editor/IDE plugin를 사용하면 OpenApi Specification의 문법 오류와 UI를 확인 할 수 있다.
OpenApi Generator의 특징
- OpenApi Generator를 사용하면 서버의 코드 스켈레톤과 클라이언트의 SDK를 자동으로 생성해준다.
- 서버 스켈레톤은 각 API에 대한 기술없이, 구현만 해주면 된다.
- JAVA 뿐만 아니라 PHP, GO, C++, C#, Python, Ruby, Typescript 등 대부분의 언어를 지원한다.
- API Interface 뿐만 아니라 model도 구현해주고, 정규 표현식 또는 다른 제한을 validation 까지 해준다.
- 브라우저에서 사용자가 직접 호출해볼 수 있는 interactive API 문서를 만들어 준다.
- Ex) Swagger Editor
OAS 문법
간단한 OAS 예시
openapi: "3.0.1"

info:
  title: "msa-bootcamp"
  version: 1.0.0

servers:
  - url: http://localhost:8080
    description: Local server

paths:
  /api/singers:
    post:
      description: create an singer
      operationId: createSinger
      tags:
        - Singer
      requestBody:
        description: singer model
        content:
          application/vnd.vroong.private.v1+json:
            schema:
              $ref: "#/components/schemas/CreateSingerRequest"
      responses:
        "201":
          $ref: "#/components/responses/Created"
        "400":
          $ref: "#/components/responses/BadRequest"
        "401":
          $ref: "#/components/responses/Unauthorized"
        "403":
          $ref: "#/components/responses/Forbidden"
        "500":
          $ref: "#/components/responses/ServerError"

components:
  schemas:
    CommonProperties:
      type: object
      properties:
        createdAt:
          $ref: "#/components/schemas/DateTime"
        updatedAt:
          $ref: "#/components/schemas/DateTime"
        createdBy:
          $ref: "#/components/schemas/UUID"
        updatedBy:
          $ref: "#/components/schemas/UUID"

    Page:
      type: object
      properties:
        size:
          type: integer
          format: int32
          default: 20
          example: 20
        totalElements:
          type: integer
          format: int64
          example: 100
        totalPages:
          type: integer
          format: int32
          example: 5
        number:
          type: integer
          format: int32
          default: 1
          example: 1

    CreateSingerRequest:
      type: object
      required:
        - name
      properties:
        name:
          type: string

    Singer:
      allOf:
        - $ref: "#/components/schemas/CommonProperties"
        - type: object
          properties:
            singerId:
              $ref: "#/components/schemas/LongId"
            name:
              type: string
서버 코드 스켈레톤 생성 및 클라이언트 SDK 생성
OpenApi Generator를 사용한다.
서버 코드 스켈레톤 생성
- 아래와 같이 gradle이 정의되어 있어야 한다.
plugin {
	id 'org.openapi.generator' version '4.3.1'
}

openApiGenerate {
    generatorName = 'spring'
    inputSpec = "$rootDir/src/main/resources/swagger/api.yml".toString()
    outputDir = "$buildDir/openapi".toString()
    apiPackage = 'com.vroong.msabootcamp.api'
    modelPackage = 'com.vroong.msabootcamp.api.model'
    modelNameSuffix = "Dto"
    apiFilesConstrainedTo = [""]
    modelFilesConstrainedTo = [""]
    supportingFilesConstrainedTo = ["ApiUtil.java"]
    configOptions = [
            delegatePattern: "true",
            title: "msabootcamp",
            useTags: "true",
            dateLibrary: "java8",
            java8: "true",
            hideGenerationTimestamp: "true"
    ]
    validateSpec = true
}

sourceSets {
    main {
        java {
            srcDir file("${project.buildDir.path}/openapi/src/main/java")
        }
    }
}
./gradlew openApiGenerate- Stub을 생성하면 아래의 파일이 생성된다.
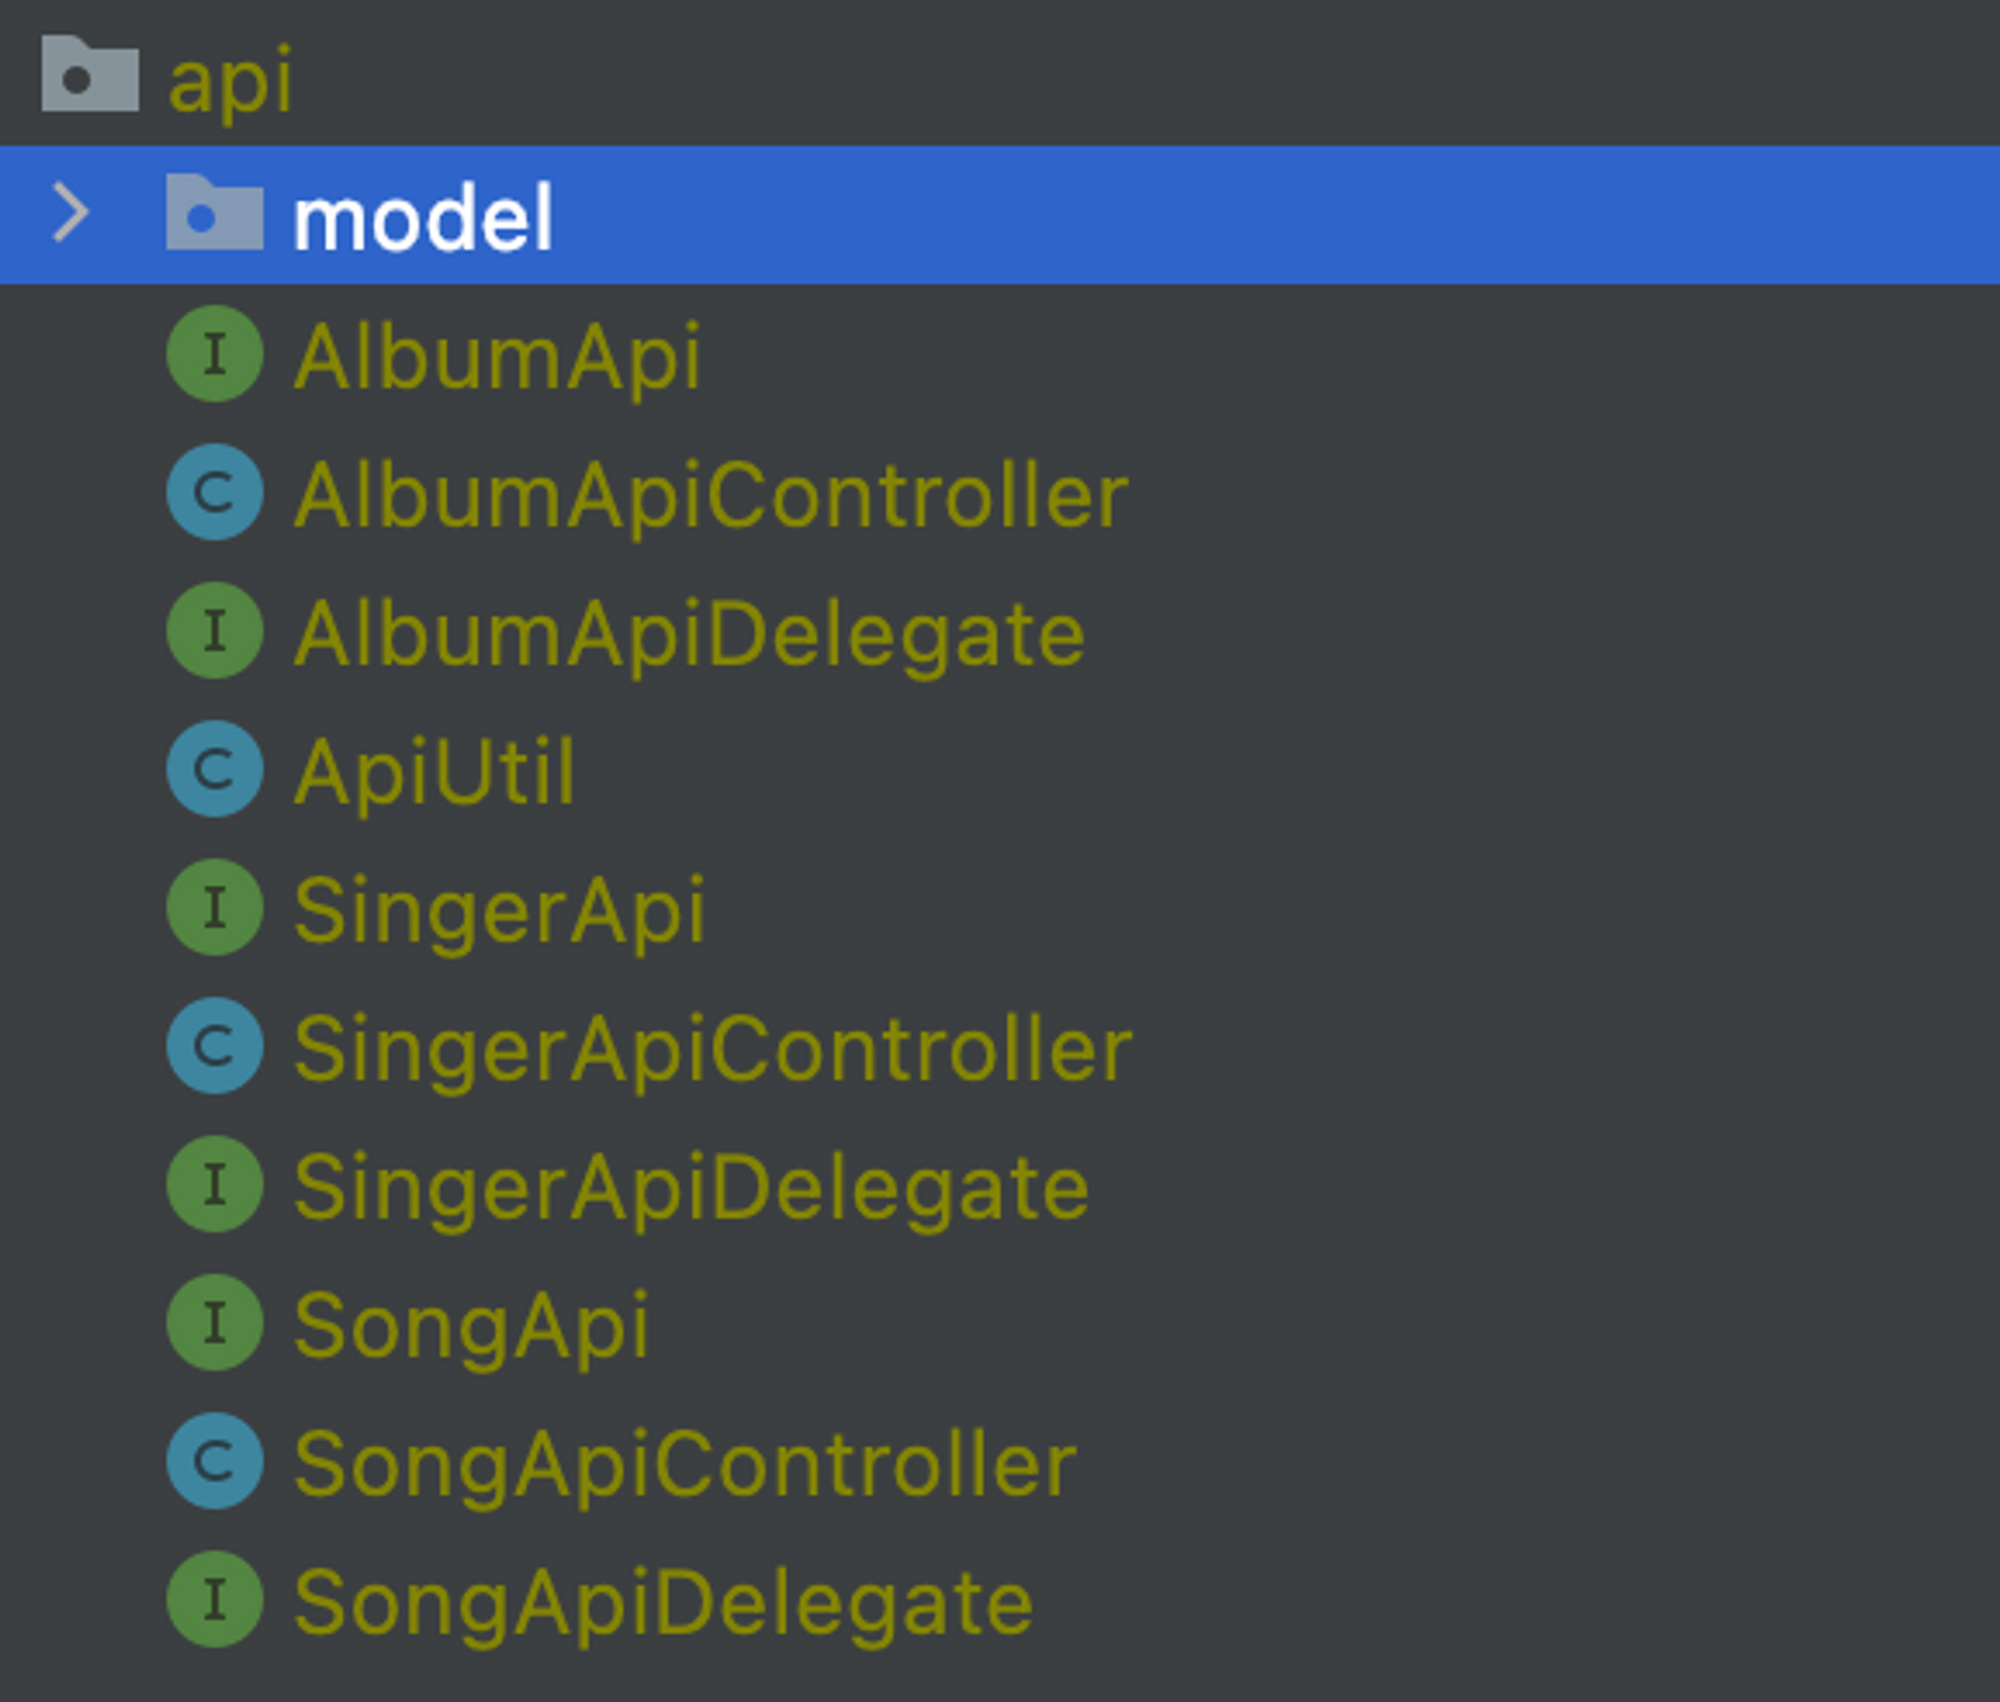
- model에는 OAS에서 정의한 schema를 가진 DTO가 있다.
클라이언트 SDK 빌드 및 배포
./gradlew :clients:clean :clients:publish -Dorg.gradle.internal.publish.checksums.insecure=true
# 배포 결과는 nexus에서 확인할 수 있습니다.
4. Controller 작성
서버 코드 스켈레톤을 이용해서 controller를 구현한다.
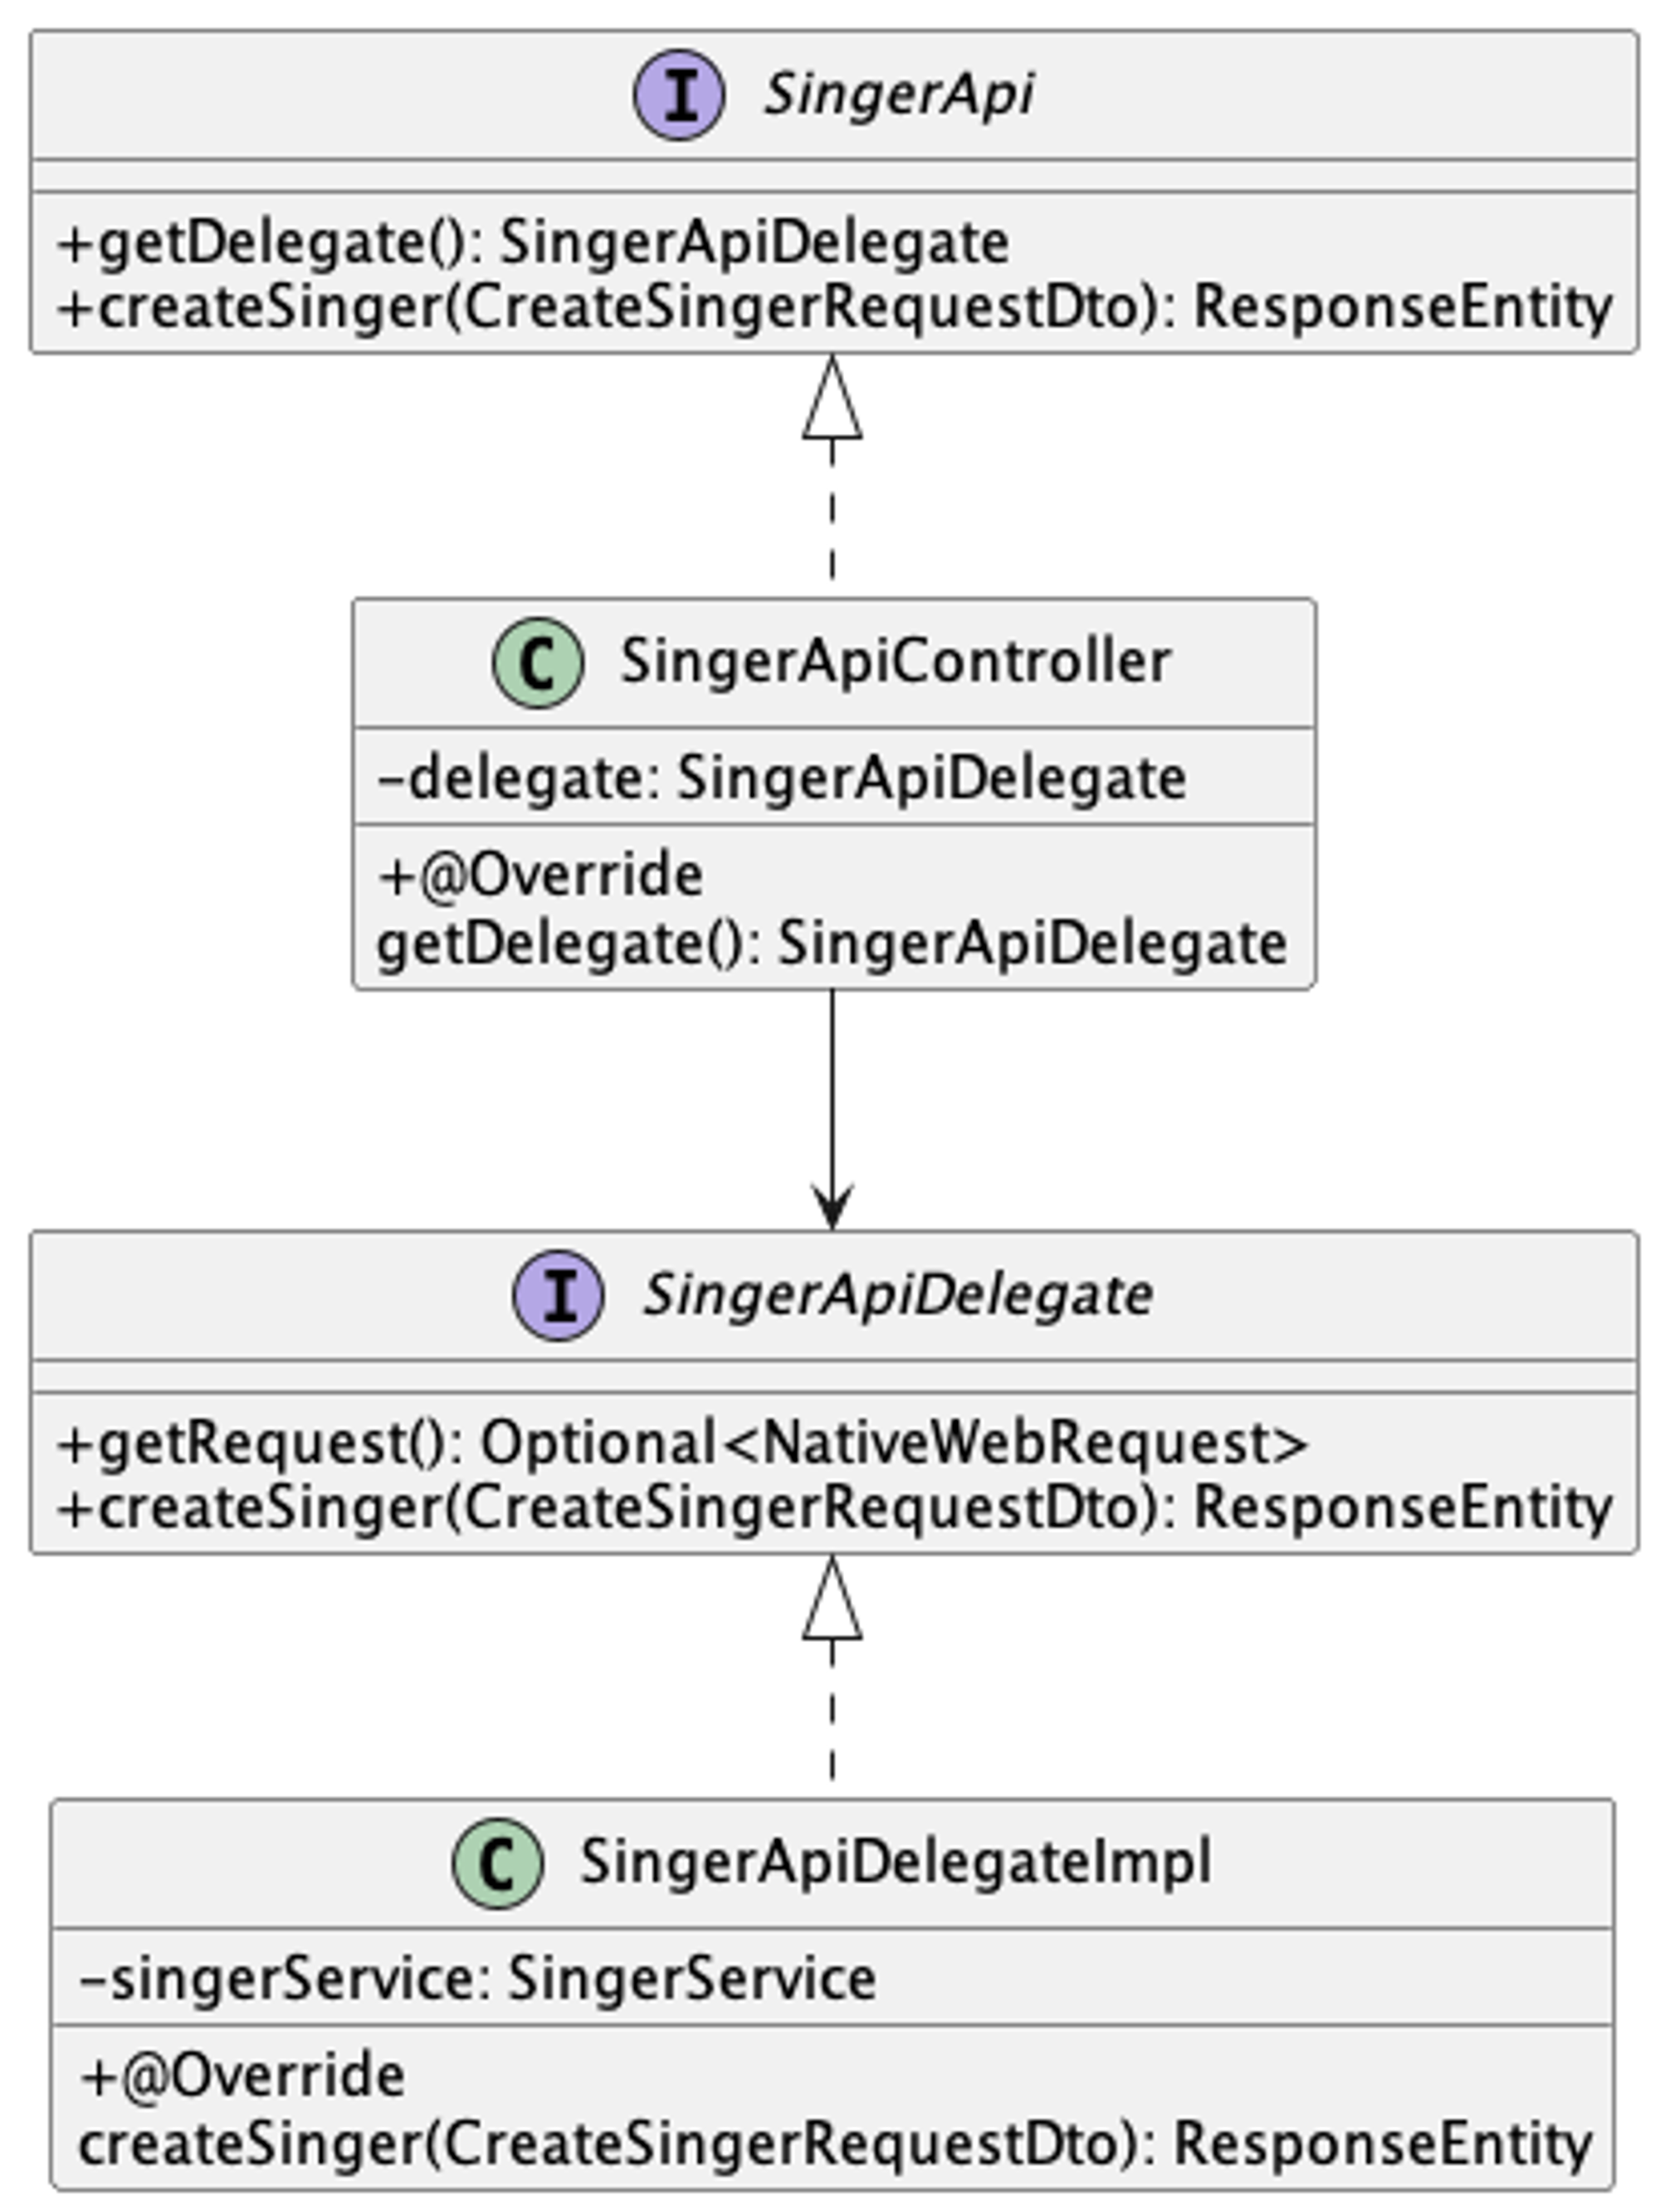
SingerApi
/**
 * NOTE: This class is auto generated by OpenAPI Generator (https://openapi-generator.tech) (5.3.0).
 * https://openapi-generator.tech
 * Do not edit the class manually.
 */

@javax.annotation.Generated(value = "org.openapitools.codegen.languages.SpringCodegen")
@Validated
@Api(value = "Singer", description = "the Singer API")
public interface SingerApi {

    default SingerApiDelegate getDelegate() {
        return new SingerApiDelegate() {};
    }

    /**
     * POST /api/singers
     * create an singer
     *
     * @param createSingerRequestDto singer model (optional)
     * @return Created (status code 201)
     *         or Bad Request (status code 400)
     *         or Unauthorized (status code 401)
     *         or Forbidden (status code 403)
     *         or Internal Server Error (status code 500)
     */
    @ApiOperation(value = "", nickname = "createSinger", notes = "create an singer", authorizations = {
        @Authorization(value = "jhipster-uaa", scopes = {
             }),
        @Authorization(value = "jhipster-uaa", scopes = {
             })
         }, tags={ "Singer", })
    @ApiResponses(value = {
        @ApiResponse(code = 201, message = "Created"),
        @ApiResponse(code = 400, message = "Bad Request", response = ProblemDetailsDto.class),
        @ApiResponse(code = 401, message = "Unauthorized", response = ProblemDetailsDto.class),
        @ApiResponse(code = 403, message = "Forbidden", response = ProblemDetailsDto.class),
        @ApiResponse(code = 500, message = "Internal Server Error", response = ProblemDetailsDto.class) })
    @RequestMapping(
        method = RequestMethod.POST,
        value = "/api/singers",
        produces = { "application/problem+json" },
        consumes = { "application/vnd.vroong.private.v1+json" }
    )
    default ResponseEntity<Void> createSinger(@ApiParam(value = "singer model") @Valid @RequestBody(required = false) CreateSingerRequestDto createSingerRequestDto) {
        return getDelegate().createSinger(createSingerRequestDto);
    }

}
SingerApiController
@javax.annotation.Generated(value = "org.openapitools.codegen.languages.SpringCodegen")
@Controller
@RequestMapping("${openapi.msabootcamp.base-path:}")
public class SingerApiController implements SingerApi {

    private final SingerApiDelegate delegate;

    public SingerApiController(@org.springframework.beans.factory.annotation.Autowired(required = false) SingerApiDelegate delegate) {
        this.delegate = Optional.ofNullable(delegate).orElse(new SingerApiDelegate() {});
    }

    @Override
    public SingerApiDelegate getDelegate() {
        return delegate;
    }

}
SingerApiDelegate
/**
 * A delegate to be called by the {@link SingerApiController}}.
 * Implement this interface with a {@link org.springframework.stereotype.Service} annotated class.
 */

@javax.annotation.Generated(value = "org.openapitools.codegen.languages.SpringCodegen")
public interface SingerApiDelegate {

    default Optional<NativeWebRequest> getRequest() {
        return Optional.empty();
    }

    /**
     * POST /api/singers
     * create an singer
     *
     * @param createSingerRequestDto singer model (optional)
     * @return Created (status code 201)
     *         or Bad Request (status code 400)
     *         or Unauthorized (status code 401)
     *         or Forbidden (status code 403)
     *         or Internal Server Error (status code 500)
     * @see SingerApi#createSinger
     */
    default ResponseEntity<Void> createSinger(CreateSingerRequestDto createSingerRequestDto) {
        return new ResponseEntity<>(HttpStatus.NOT_IMPLEMENTED);

    }

}
SingerApiDeleateImpl
@RequiredArgsConstructor
@Component
public class SingerApiDelegateImpl implements SingerApiDelegate {

  private final SingerService singerService;

  @Override
  public ResponseEntity<Void> createSinger(CreateSingerRequestDto createSingerRequestDto) {
    SingerDto singerDto = singerService.createSinger(createSingerRequestDto);

    return ResponseEntity
        .created(HeaderUtils.uri(String.valueOf(singerDto.getSingerId())))
        .build();
  }
}
5. Messaging
- 이벤트 메세지 또는 커맨드 메세지를 이용하여 상호간에 통신하는 방식
이벤트
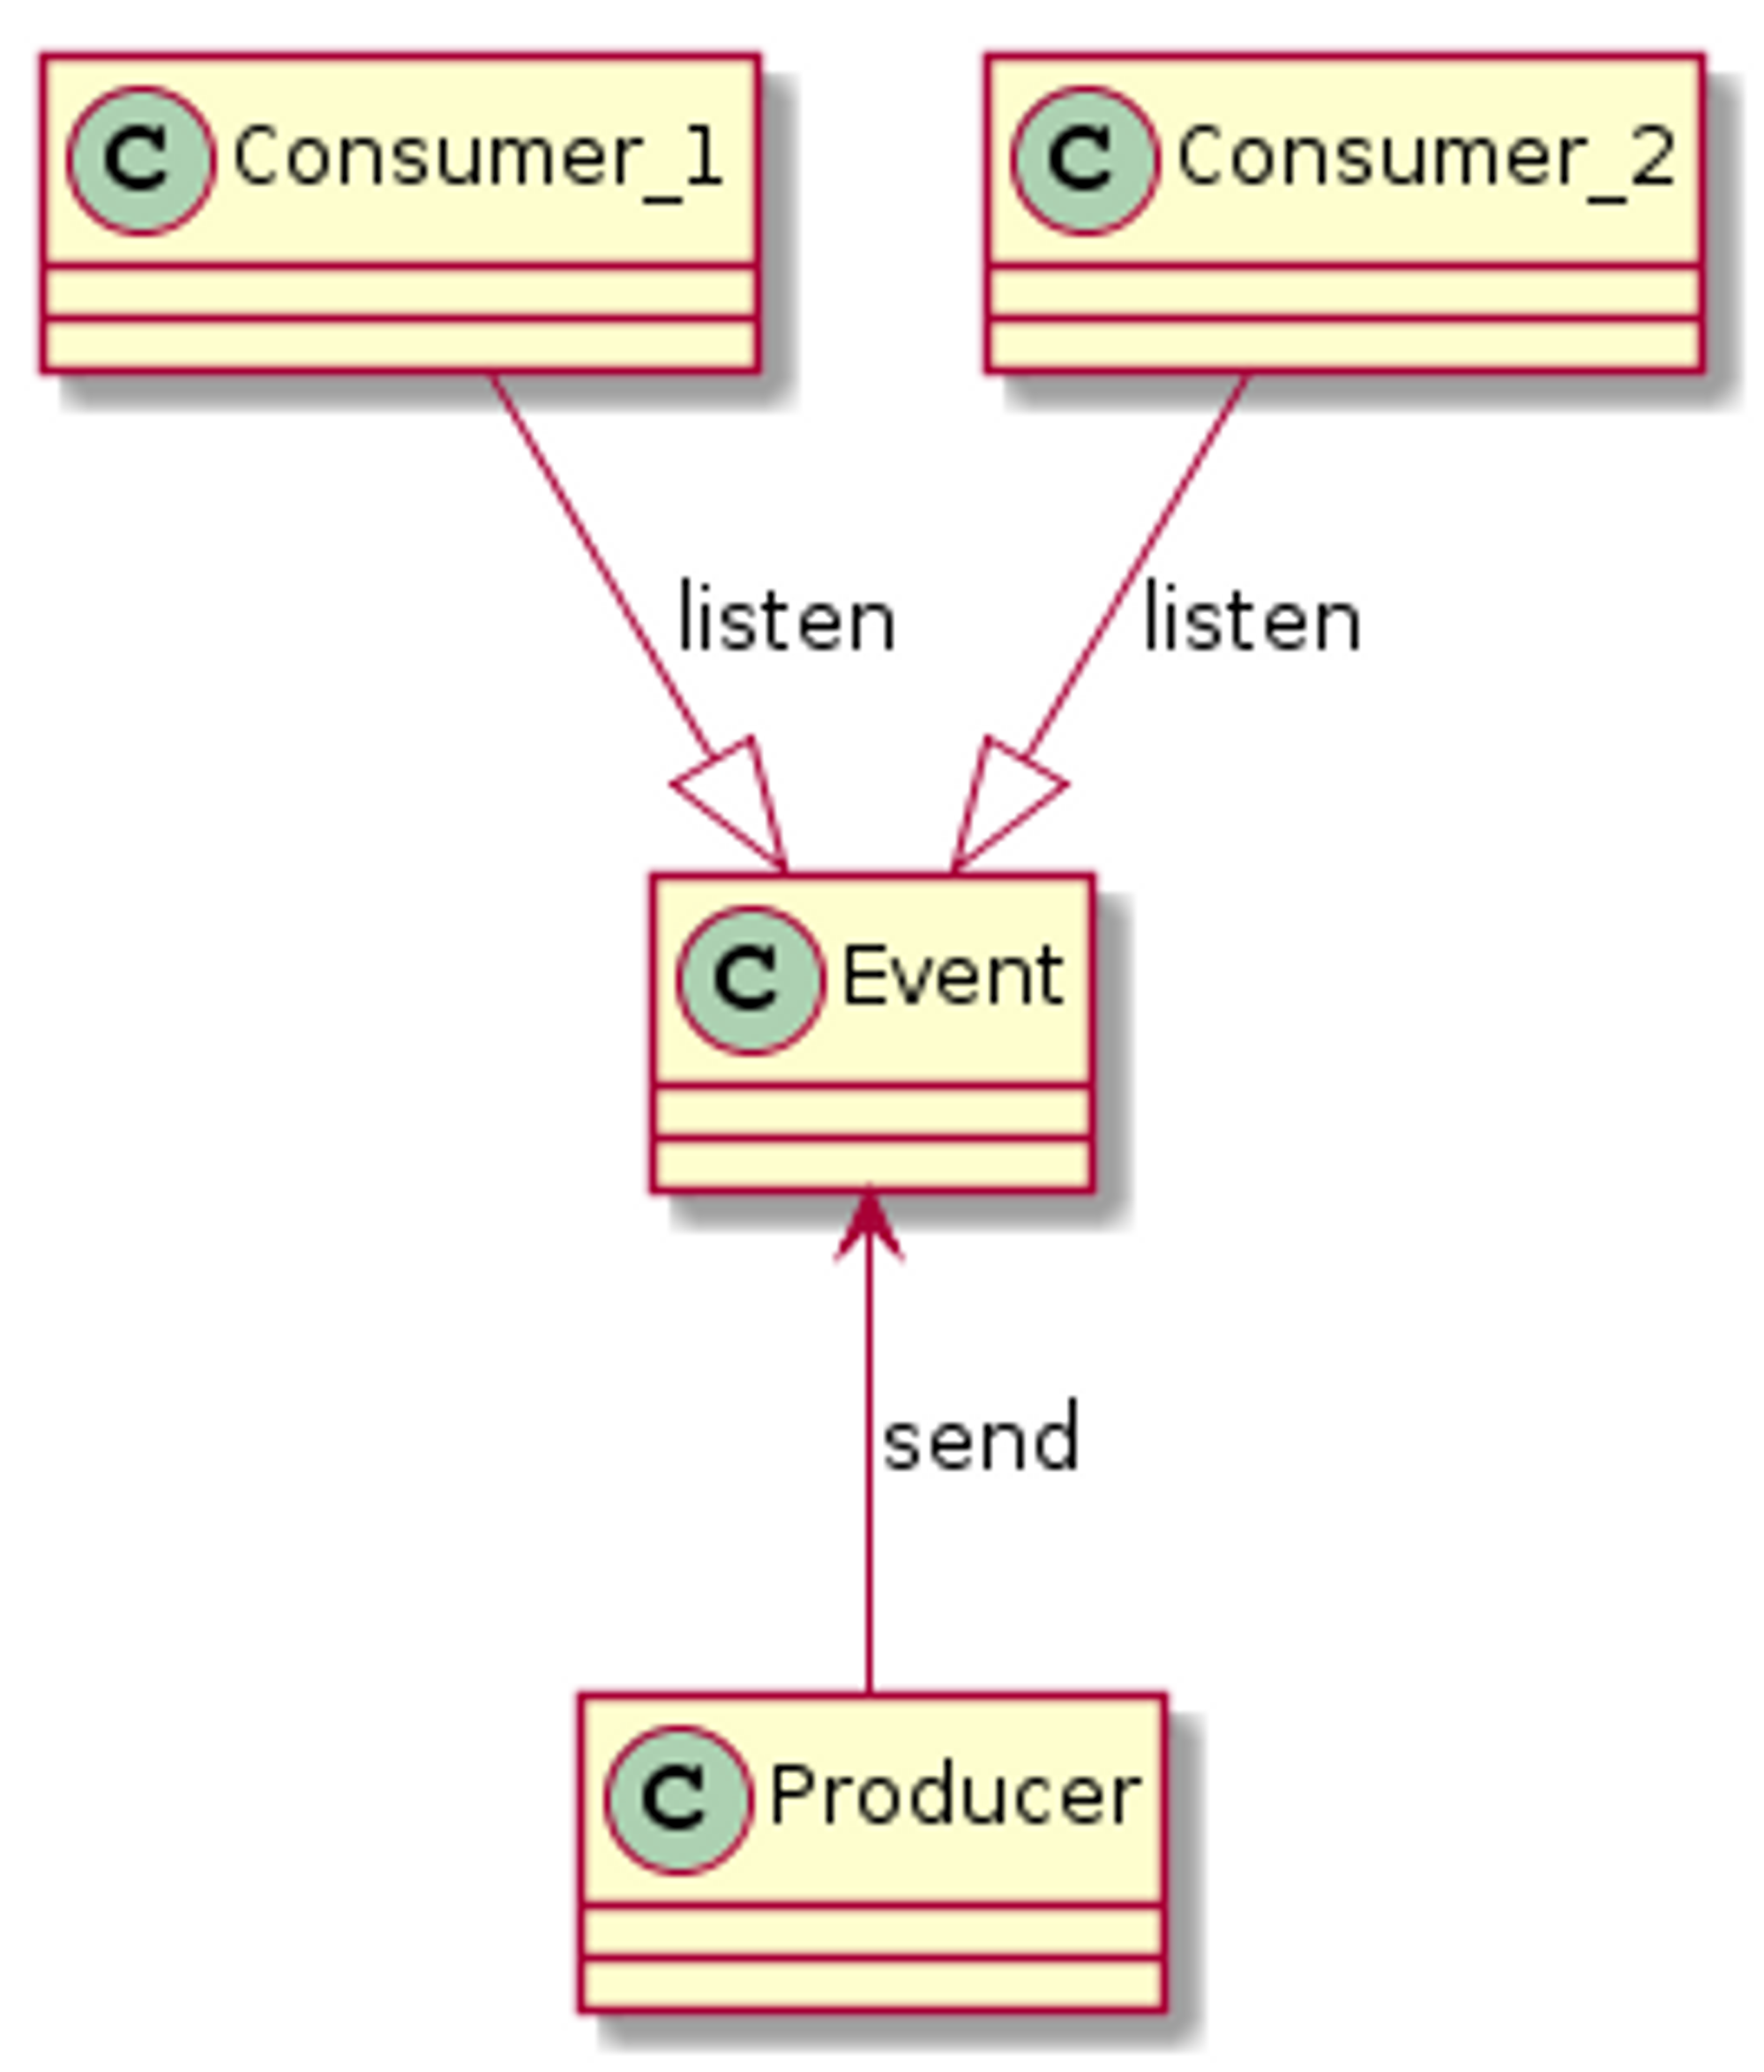
- 이미 일어난 정보에 대한 메세지이다.
- immutable 하다.
- producer는 이벤트의 comsumer가 누구인지, 무엇을 하는지 모른다.
- ex)
- 신규 물품이 입고되었을 때 필요한 시스템만 이벤트를 구독한다.
- 신규 물품이 입고된 것은 이미 일어난 사건이다.
커맨드
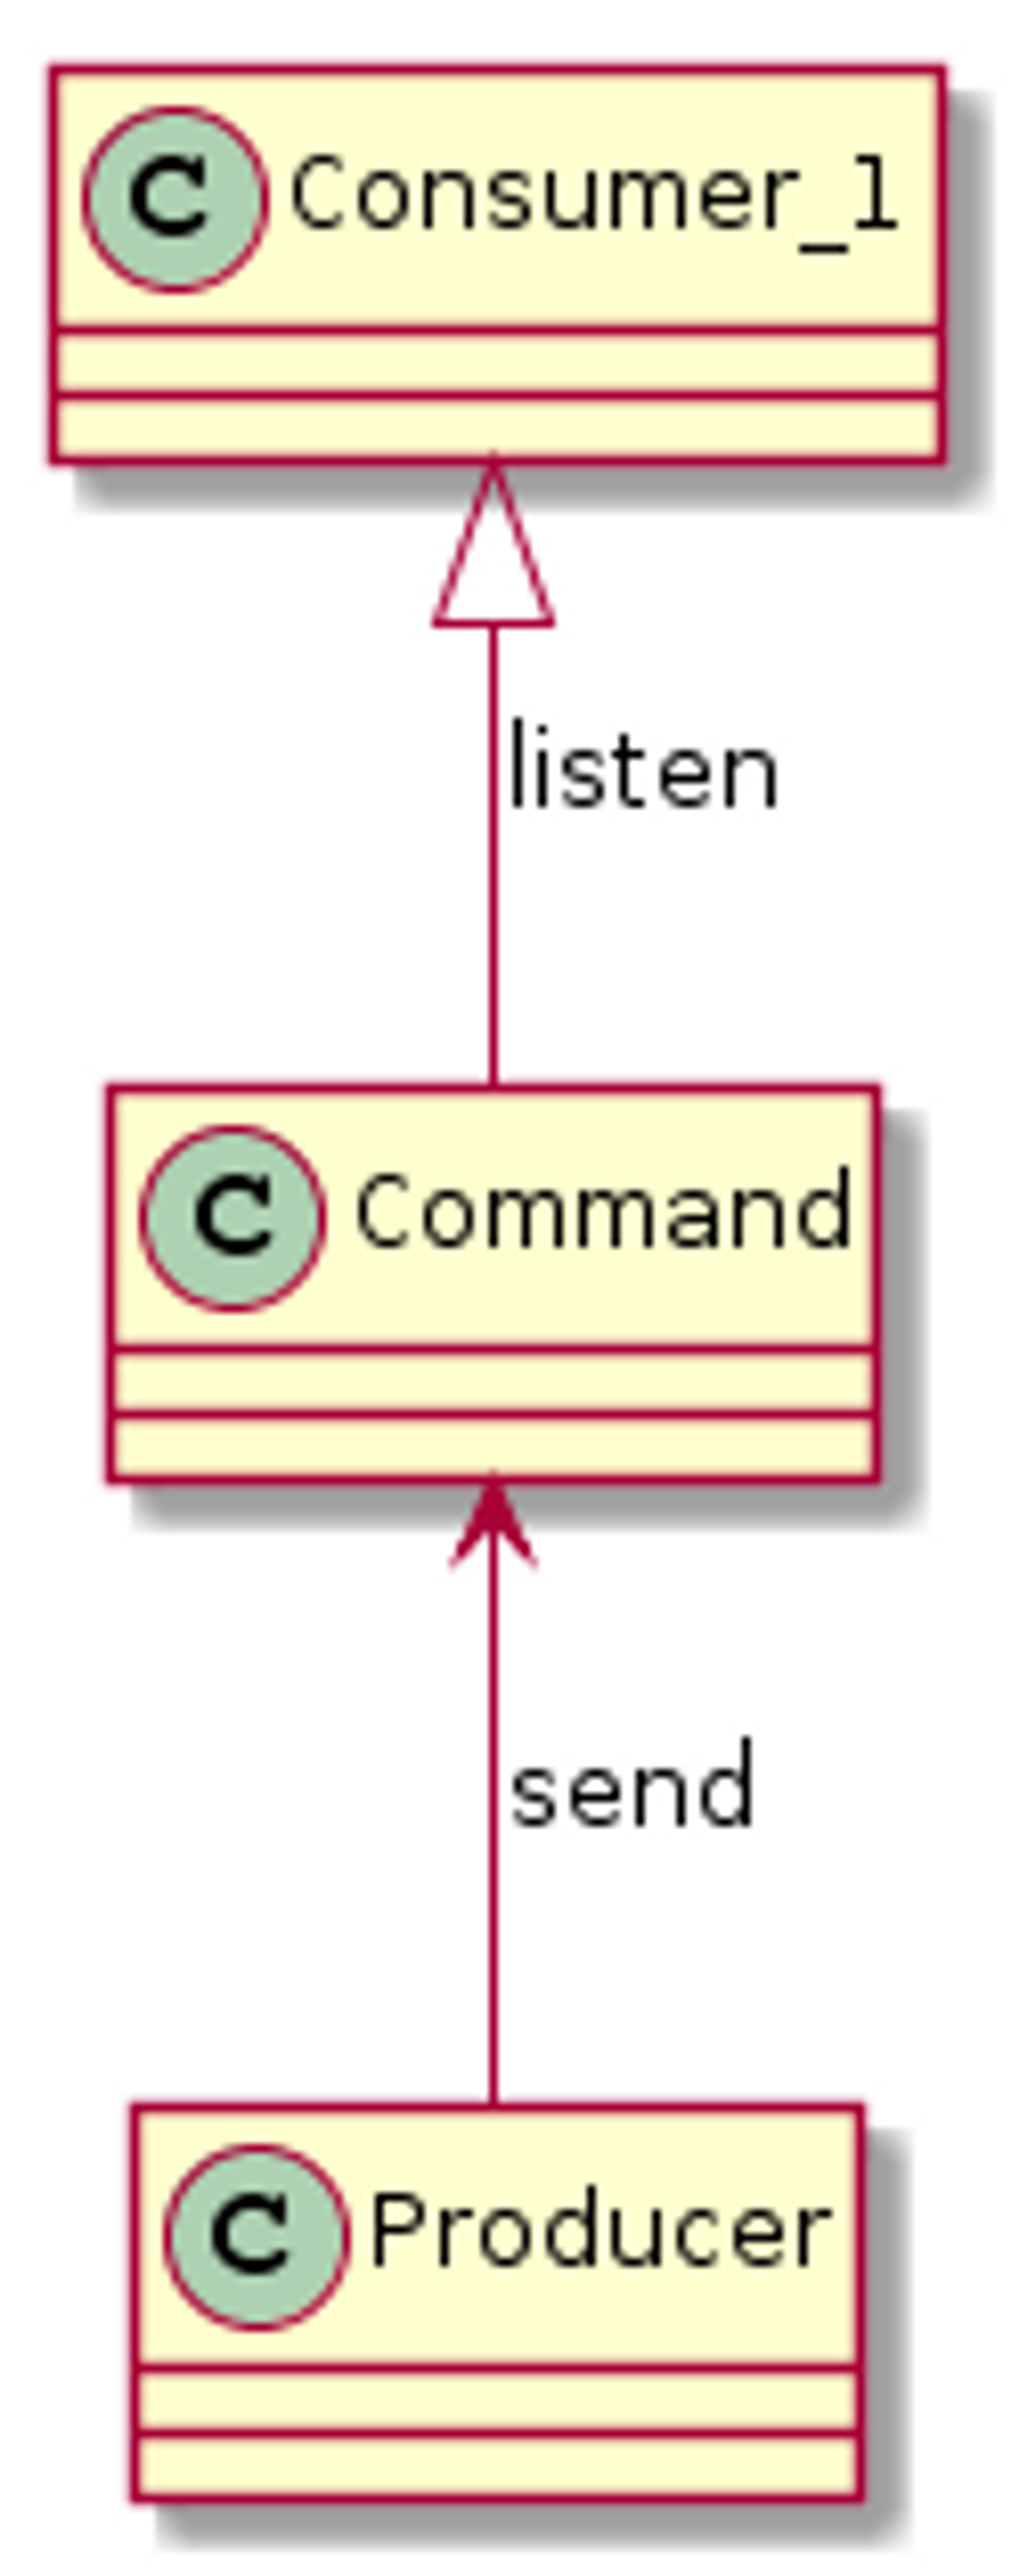
- 수행할 작업에 대한 하나의 시스템에서 다른 시스템으로의 메세지
- 미래에 발생할 사건의 트리거가 된다.
메시징을 사용하는 이유
- REST API는 클라이언트가 요청하는 시점에 서버가 항상 가용해야 하는 문제가 있다.
- REST와 같은 동기 IPC (Inter Process Communication) 문제점을 해결하고자 비동기 메시징을 사용한다.
- 메시지 브로커가 가용하다면 consumer의 장애 시점에도 producer가 발행한 메시지는 메시지 브로커에 적재되며, consumer가 장애에서 복구되면 메시지를 소비할 수 있다.
Transactional Outbox Pattern
- 메시징을 통해 데이터를 처리할 때 데이터의 일관성을 처리하기 위해 사용한다.
- producer 역할을 하는 서비스에서 발생한 도메인 이벤트/메시지는 적어도 한번(at least once) 발행해야 한다.
- 방법
- producer 역할을 하는 서비스에 OUTBOX 테이블을 생성하고, 도메인 이벤트/메시지를 트랜잭션 범위안에서 OUTBOX 테이블에 insert한다.
- 별도의 MessageRelay가 주기적으로 OUTBOX 테이블에 있는 메세지를 발행한다.
- MessageRelay는 polling publisher로 구현할 수 있다.
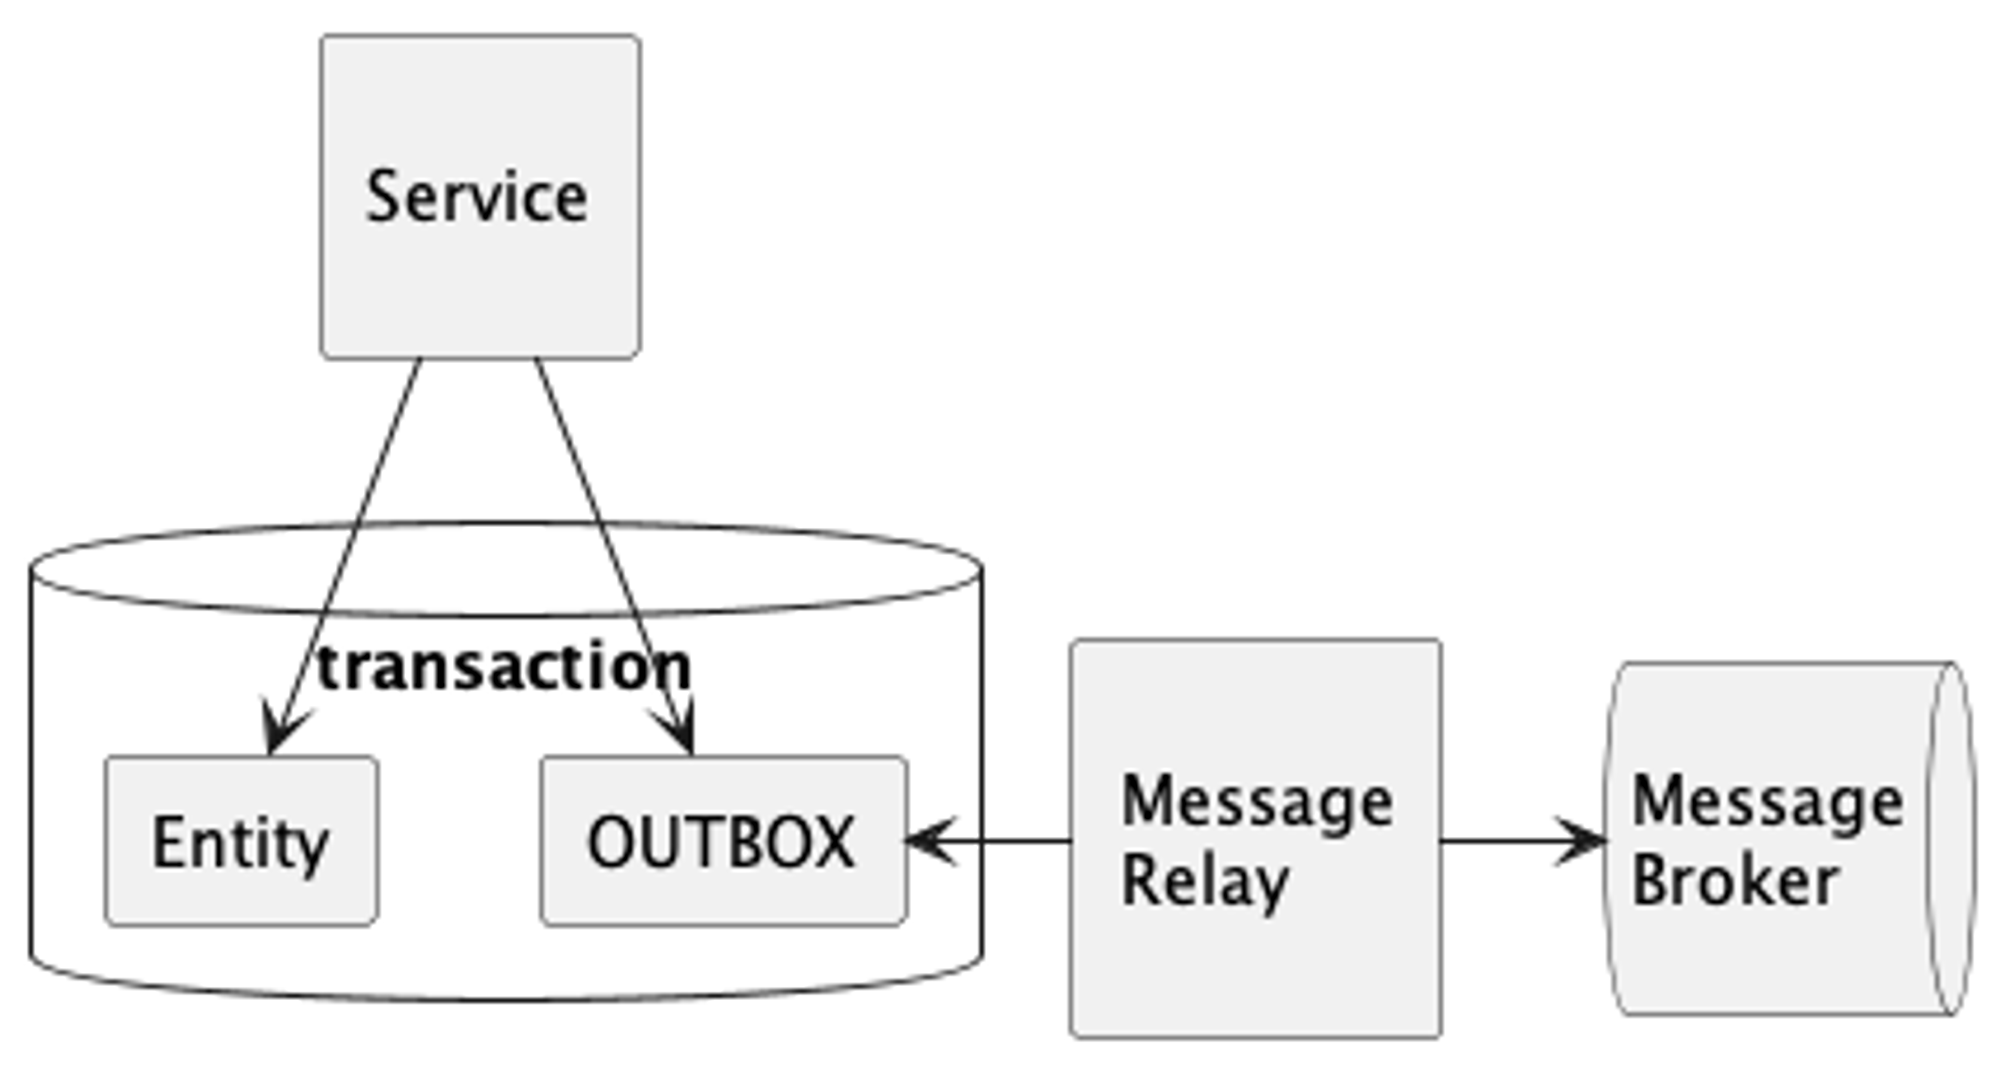
- MessageRelay는 polling publisher로 구현할 수 있다.
- 데이터베이스 트랜잭션이 커밋된 경우에만 MessageRelay를 통해서 메시지를 발행한다.
- MessageRelay를 통하기 때문에 메세지 발행에 시차는 생기지만, Eventual Consistency를 유지한다.
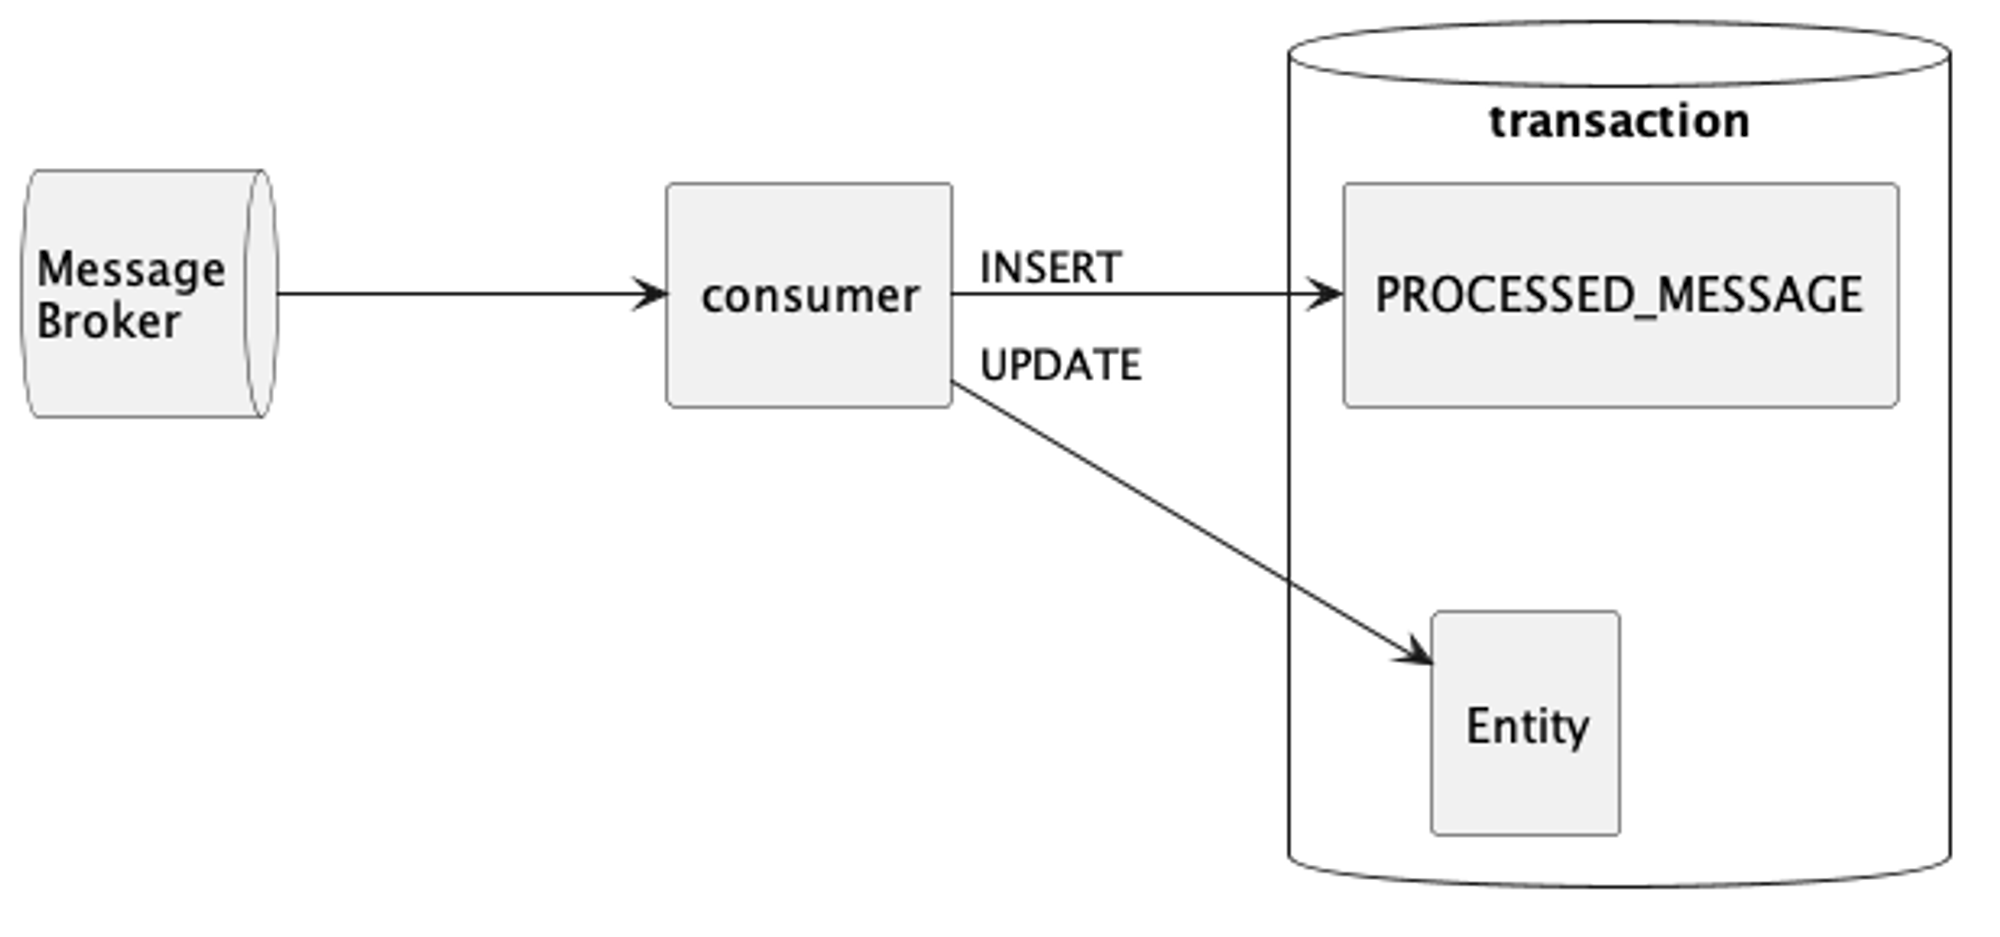
멱등 수신자 (Idempotent Receiver)
- consumer 역할을 하는 서비스는 동일한 메시지를 중복으로 여러번 수신할 수 있으므로, 중복 메시지로 인한 사이드 이펙트가 발생하지 않도록 멱등 수신자를 구현해야 한다.
- 방법
- PROCESSED_MESSAGE 테이블을 추가한다.
- 메세지를 수신하면 식별자를 이용해서 테이블에서 조회한다.
- 테이블에서 조회된다면 메세지를 무시한다.
- 조회되지 않는 메세지면 PROCESSED_MESSAGE에 저장하고 처리한다.
- (메세지 식별자에 unique 제약조건을 걸어서 구분할 수도 있다.)
Kafka 코드
application.yml
spring: cloud: stream: kafka: binder: headers: ["messageId", "messageType", "messageVersion", "messageSource"] auto-create-topics: false # Kafka - SASL_SSL설정과 SCRAM-SHA-512 를 이용한 ID Password 설정 # @see https://wiki.mm.meshkorea.net/pages/viewpage.action?pageId=95856174 configuration: sasl: jaas: config: 'org.apache.kafka.common.security.plain.PlainLoginModule required username="alice" password="alice-secret";' mechanism: PLAIN security: protocol: SASL_PLAINTEXT bindings: messageChannel: binder: kafka destination: local-msabootcamp-output producer: # @see https://docs.spring.io/spring-cloud-stream-binder-kafka/docs/3.0.10.RELEASE/reference/html/spring-cloud-stream-binder-kafka.html#kafka-producer-properties header-mode: headers partition-key-expression: headers['partitionKey'] partition-count: 1 subscribableChannel: binder: kafka destination: local-msabootcamp-output content-type: application/json consumer: header-mode: embeddedHeaders checkpointMode: record default-binder: kafkaspring.cloud.stream.kafka.binder를 이용해서KafkaBinderConfigurationProperties.class의 값을 세팅
PersistentEventCreator.class
public class PersistentEventCreator {

  private final PersistentEventRepository repository;
  private final ObjectMapper objectMapper;

  @Transactional
  public void create(String eventType, Object source) {
    String body = "";
    try {
      body = objectMapper.writeValueAsString(source);
    } catch (IOException e) {
      log.error("Serialization failed", e);
    }
    final PersistentEvent entity = PersistentEvent.newInstance(eventType, UUID.randomUUID(), body);
    repository.save(entity);
  }
}
PersistentEventPublisher.class - publish()
@Transactional
@Scheduled(fixedDelayString = "PT50S", initialDelayString = "PT10S")
@SchedulerLock(name = "PersistentEventPublisher")
@Async
public void publish() {
  final Instant timeScope = Instant.now(Clock.system(ZONE_ID)).minus(1, ChronoUnit.MINUTES);
  List<PersistentEvent> candidates = repository.findUnproducedByTimeScope(timeScope); // OUTBOX 조회
  if (candidates.isEmpty()) {
    return;
  }

  writeLog("started", kv("total", candidates.size()));

  int success = 0;
  for (PersistentEvent candidate : candidates) {
    try {
      boolean produced = producer.produce(candidate); // produce
      if (produced) {
        candidate.markProduced();
        success++;
        writeLog("handling",
            kv("persistentEventId", candidate.getId()),
            kv("eventType", candidate.getEventType()),
            kv("eventId", candidate.getEventId())
        );
      } else {
        throw new RuntimeException("Message was not produced");
      }
    } catch (Exception e) {
      candidate.markFailed();
      reportError(e, kv("persistentEventId", candidate.getId()));
    }
  }

  writeLog("success", kv("success", success), kv("total", candidates.size()));
}
MessageProducer.class
public class MessageProducer {

  private final MessageChannel messageChannel;

  public boolean produce(PersistentEvent persistentEvent) {
    final String body = persistentEvent.getBody();
    Message<?> message = MessageBuilder
        .withPayload(body)
        .setHeader(MessageKey.ID, persistentEvent.getEventId())
        .setHeader(MessageKey.TYPE, persistentEvent.getEventType())
        .setHeader(MessageKey.VERSION, 1)
        .setHeader(MessageKey.SOURCE, PROJECT_NAME)
        .setHeader(MessageKey.RESOURCE, body.getClass().getSimpleName())
        .setHeader(MessageKey.PARTITION_KEY, persistentEvent.getPartitionKey())
        .build();

    log.debug("Event publish: {}", message);
    return messageChannel.send(message, MessagePolicy.DEFAULT_TIMEOUT);
  }
}
MessageSubscriber.class
public class MessageSubscriber {

  private final ReceivedEventRepository receivedEventRepository;

  @StreamListener(value = ConsumerChannel.CHANNEL)
  public void subscribe(Message<Album> event) {
    UUID messageId = event.getHeaders().getId();
    Optional<ReceivedEvent> receivedEvent = receivedEventRepository.findByMessageId(messageId);

    if (receivedEvent.isPresent()) {
      log.info("Duplicated event: {}", receivedEvent.get().getMessageId());
      return;
    }
    receivedEventRepository.save(new ReceivedEvent(event.getHeaders().getId()));
    log.debug("Event received: {}", event.getPayload());
  }
}
전체 흐름

6. CI/CD
CI/CD란
- CI (Continuous Integration): 애플리케이션의 소스 변경 사항이 지속적으로 빌드 및 테스트되어 공유 리포지토리에 통합되는 것이다.
- CD (Continuous Delivery/Deployment): 변경 사항을 테스트 또는 프로덕션 환경에 지속적으로 배포하는 것이다.
Jenkinsfile
jenkins는 CI 도구이다.
- 빌드 → 테스트 → 코드 분석 → 도커 이미지 빌드 → helm chart 빌드
- 위 과정을 파이프라인으로 자동화 해준다.
파이프라인은 Job들을 순차적 또는 병렬적으로 실행시키거나 작성한 스크립드로 이벤트를 연속적으로 실행시키는 것이다.
@Library('meshkorea') _ vroongNeoMsaJavaPipeline( team: '', ecrRepoName: 'vroong/msabootcamp', argoAppName: 'vroong-msabootcamp', gradleBuildArguments: '' )- team: 슬랙 {team}-build-alerts 채널에 관련 alert를 발생시킨다.
- ecrRepoName: Jenkins에서 도커 빌드 후 push할 ECR 이름
- argoAppName: argoCD 앱 이름
- gradleBuildArguments: jar 파일 빌드시 뒤에 추가할 argument
Jenkins 파이프라인 적용 방법
- 리포지토리 root에 Jenkinsfile이 있어야만 파이프라인이 실행된다.
- github push, PR, merge 와 같은 이벤트 발생시 파이프라인이 구동된다.
- 도커 이미지 tag는 파이프라인에 도커 빌드 과정에서 {tag}-{commit hash} 형태로 빌드 후 ECR에 push된다.
- tag가 example이고, commit hash가 2d48cj3a인 경우 도커 이미지 tag는 example-2d48cj3a이다.
Helm values
- Helm은 K8S 패키지 관리를 도와주는 패키지 매니저이다.
- ex) dev와 qa, prod 환경의 DB 주소가 다르다면 이를 관리해 주는 것이다.
- vroong-{appname}-helm-values 리포지토리 에 필요한 환경 변수 추가
- 위 리포지토리를 보면 다음과 같은 구조가 있다.
- dev1
- prod
- qa1 ~ 4
- values.yaml
- argoCD에서 helm values를 배포하면 K8S 서비스, deployment(replica set, pod), 서비스 account, config map 등의 리소스를 만들어준다.
- 위 리포지토리를 보면 다음과 같은 구조가 있다.
- values.yaml
- 모든 환경에 동일하게 적용되어야 하는 내용이 선언되어 있다.
- 각 환경 별로 values.yaml 파일이 또 있다.
- 각 환경 별로 바인딩 되어야 하는 환경 변수를 선언한다.
- override하고 싶은 내용을 선언한다.
빌드 및 배포 과정

- Start
- Init
- 저장소 checkout 후, commit hash를 구한다.
- 슬랙에 파이프라인 구동 메세지를 보낸다.
- Jenkinsfile에 작성한 값을 읽어낸다.
- Check the docker image
- ECR에 같은 tag를 가진 이미지가 있는지 확인한다.
- Gradle build
- nexus에 접근하기 위한 계정 정보를 복사한다.
- jar 파일을 빌드한다.
- code review / unit test
- sonarqube로 코드 리뷰를 하고 unit 테스트를 수행한다.
- Docker / ECR login
- 도커 이미지를 빌드하고 tag를 붙인다.
- ECR에 login한다.
- ECR push
- ECR에 도커 이미지를 push한다.
- ArgoCD trigger
- argoCD에 login한다.
- 슬랙에 빌드 완료 메세지를 보낸다.
- End
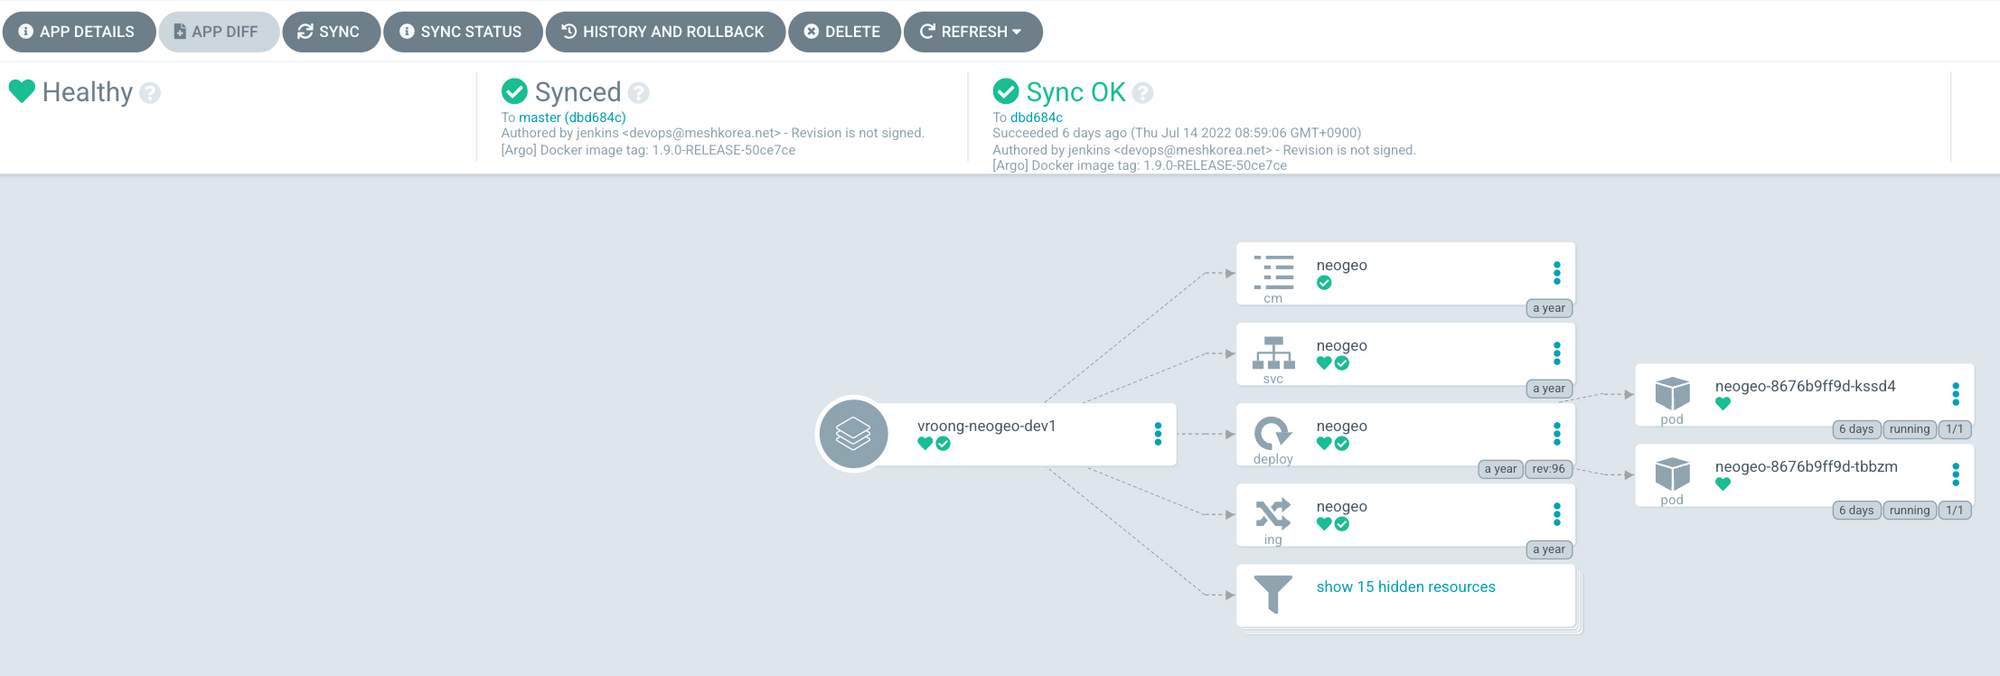
Jenkins 과정을 거친 후 APP DIFF 버튼을 눌러, helm values 변경 사항을 확인한다.
변경 사항에 이상이 없으면 SYNC 버튼을 누른다.
pod가 잘 교체 되는지 확인한다.
k9s/{서비스 이름으로 검색}
- 상단 Context에서 현재 환경을 확인할 수 있다.
- 새로운 pod가 실행된 후 완료되면 기존 pod를 교체한다.
모니터링한다.
7. UAA
User Account and Authentication
MSA Resource 서버를 보호하기 위한 Authorization Server
OAuth2 (Open Authorization) 방식
- Authorization Code Grant Type
- Resource Owner Password Grant type
- Client Credentials Grant Type
Client Credentials Grant Type Flow https://img1.daumcdn.net/thumb/R1280x0/?scode=mtistory2&fname=https%3A%2F%2Fblog.kakaocdn.net%2Fdn%2FAGn3b%2FbtqVyURyeZN%2F77J24Xr2Y3aAIZyLUsQZg1%2Fimg.png
security:
  oauth2:
    client:
      access-token-uri: http://localhost:9999/oauth/token
      user-authorization-uri: http://localhost:9999/oauth/token
      client-id: internal
      client-secret: internal
      scope: web-app
      grant-type: client_credentials
      authorized-grant-type: password, client_credentials, refresh_token
    resource:
      jwt.key-uri: http://localhost:9999/oauth/token_key