*Spring Security in Action을 읽고 작성했습니다.
https://product.kyobobook.co.kr/detail/S000061695014
Spring Security와 구성 요소
Spring Security는 스프링 프로젝트의 사실상 표준(defacto)입니다. 보안에 관련된 사전 구성 요소가 제공되며, 필요에 따라 일부 구성 요소만 재정의하여 사용할 수 있습니다.
Spring Security 의존성을 프로젝트에 추가하고 애플리케이션을 시작하면 아래와 같은 메시지를 확인할 수 있습니다.
Using generated security password: 41632cba-2835-43e3-85c8-3aeac7ce686a

This generated password is for development use only. Your security configuration must be updated before running your application in production.
구성 요소를 재정의 하지 않으면 위와 같이 기본 사용자
user와 암호(UUID)를 제공합니다. 애플리케이션의 엔드포인트를 호출하기 위해서는 Basic Auth를 사용하여 인증해야 합니다.# 인증을 사용한 경우 curl -u user:41632cba-2835-43e3-85c8-3aeac7ce686a http://localhost:8080/hello < Hello! # 인증을 사용하지 않은 경우 curl -v -X GET http://localhost:8080/hello < ... < HTTP/1.1 401 < ...위와 같은 기본 사용자와 애플리케이션이 시작될 때 발급되는 암호를 이용한 인증은 사전 구성된
UserDetailsService,PasswordEncoder를 통해 구현됩니다.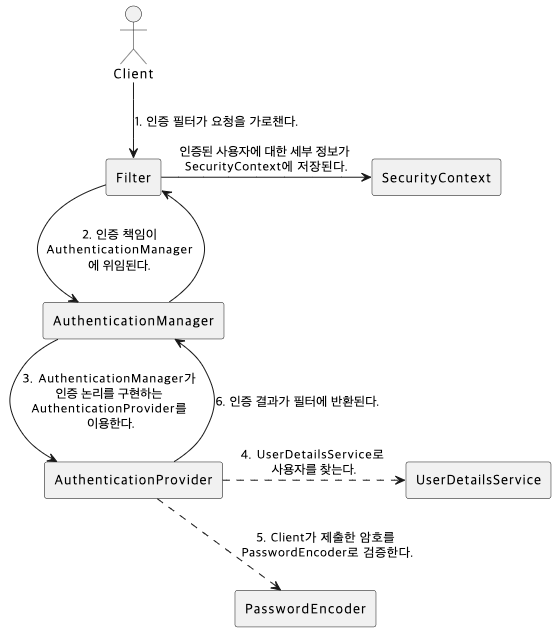
- 가장 기본적인 Spring Security의 구성 요소는 아래와 같습니다.
AuthenticationProvider: 인증 논리를 정의하고 사용자와 암호의 관리를 위임합니다.UserDetailsService: 사용자에 대한 세부 정보를 제공합니다.PasswordEncoder: 인호를 인코딩하며, 암호가 기존 인코딩과 일치하는지 검증합니다.
기본 구성 요소 재정의
- 기본 구성 요소를 재정의하여 상황에 맞게 인증을 구현하고 보안을 적용할 수 있습니다.
- 기본 구성 요소는 직접 구현하여 만들거나, Spring Security에서 재공하는 구현을 사용할 수 있습니다.
UserDetailsService와PasswordEncoder는 가장 기본적인 구성 요소로, 인증에 이용되며 대부분의 애플리케이션은 이 두 구성 요소를 재정의합니다.
*“hello!“응답을 반환해주는
/hello엔드포인트를 구현했다고 가정합니다.
PasswordEncoder 재정의
- 먼저
PasswordEncoder부터 재정의해보겠습니다. 이 구성 요소는 암호를 인코딩하는 정책에 관한 내용을 설정합니다. BCryptPasswordEncoder는 Spring Security에서 제공하는 권장 구현입니다.
@Bean
public PasswordEncoder passwordEncoder() {
    int strength = 10; // the log rounds to use, between 4 and 31
    return new BCryptPasswordEncoder(strength);
}
UserDetailsService 재정의
- UserDetailService는 사용자의 이름, 암호 등 정보를 제공해주며, 단 하나의 read-only 메서드를 제공합니다.
UserDetails loadUserByUsername(String username) throws UsernameNotFoundException;
- Spring Security는
InMemoryUserDetailsManager구현을 제공해줍니다. 이 구현은 메모리에 자격 증명을 저장해서 Spring Security가 요청을 인증할 때 사용할 수 있게 해줍니다.InMemoryUserDetailsManager구현은 예제나 개념 증명 또는 테스트 용도로 사용하기 편리한 구현입니다.
상용 환경에서의 사용은 권장하지 않습니다.
@Bean
public UserDetailsService userDetailsService(PasswordEncoder passwordEncoder) {
UserDetails user = User.builder()
    .username("user")
    .password(passwordEncoder.encode("password"))
    .roles("USER")
    .build();

return new InMemoryUserDetailsManager(user);
- 이제 기본 구성 요소 재정의를 완료했습니다. 아래 명령어를 사용하면 InMemoryUserDetailsManager에 등록한 사용자를 이용해서 요청할 수 있습니다.
curl -u user:password http://localhost:8080/hello
< hello!
엔드포인트 권한 부여 구성 재정의
- 우리는 모든 엔드포인트를 보호할 필요는 없으며, 보안이 필요한 엔드포인트에 대해 다른 권한 부여 규칙을 선택할 수 있어야 합니다.
- 엔드포인트별 다른 권한 부여 규칙을 선택하기 위해
SecurityFilterChain을 사용합니다. SecurityFilterChain는@Bean으로 등록해야 하며,SecurityFilterChain과 관련된 자동 구성 설정을 사용하기 위해서@EnableWebSecurity을 사용해야 합니다.
@Configuration
@EnableWebSecurity
public class SecurityConfiguration {

  @Bean
  public SecurityFilterChain securityFilterChain(HttpSecurity http) throws Exception {
    return http.httpBasic(Customizer.withDefaults())
        .authorizeHttpRequests(authorize -> authorize
                .requestMatchers("/hello").authenticated()
                .anyRequest().permitAll()
        )
        .build();
  }

  // UserDetailsService, PasswordEncoder
}
- 위 설정은
/hello엔드포인트에 대해 인증을 요구하며, 다른 엔드포인트는 인증을 요구하지 않습니다.curl http://localhost:8080/bye < bye!
*Spring Security in Action에서 사용된
WebSecurityConfigurerAdapter는 Spring Security 5.7버전 이후로 지원이 중단되었습니다.
따라서 이제는WebSecurityConfigurerAdapter를 구현하기보다SecurityFilterChain을 사용하는 것이 바람직합니다.
AuthenticationProvider 재정의
- 위 내용처럼 Spring Security는 상당히 유연하므로 다양한 옵션을 선택할 수 있습니다.
- 그림을 다시 살펴봅시다.
AuthenticationProvider는 인증 논리를 구현하고 사용자와 암호 관리를UserDetailsService와PasswordEncoder에 위임합니다. - 따라서
AuthenticationProvider를 재정의할 때는 주어진 구성 요소를 활용하는 것이 좋습니다.@Component @RequiredArgsConstructor public class CustomAuthenticationProvider implements AuthenticationProvider { // 재정의한 구성 요소 사용 private final UserDetailsService userDetailsService; private final PasswordEncoder passwordEncoder; @Override public Authentication authenticate(Authentication authentication) throws AuthenticationException { String username = authentication.getName(); String password = String.valueOf(authentication.getCredentials()); final UserDetails userDetails = userDetailsService.loadUserByUsername(username); // BCryptPasswordEncoder는 해쉬를 생성할 때마다 다른 salt 값을 사용합니다. // 따라서 matches 메서드를 사용해서 값이 일치하는지 검증해야 합니다. if (passwordEncoder.matches(password, userDetails.getPassword())) { return new UsernamePasswordAuthenticationToken(username, password, userDetails.getAuthorities()); } throw new AuthenticationCredentialsNotFoundException("Failed to authenticate"); } @Override // Authentication 객체가 지원하는 유형인지 확인합니다. public boolean supports(Class<?> authentication) { return authentication.equals(UsernamePasswordAuthenticationToken.class); } } - 이제
/hello엔트포인트에 요청을 보내면 재정의한AuthenticationProvider,UserDetailsService,PasswordEncoder를사용하여 인증합니다.